How to Define a Tracking Metric
This topic describes the overall process for defining a tracking metric. The Define Metrics task shows only tracking metrics. To work with analysis metrics, see Real Property / Strategic Financial Analysis / Personalize SFA from Smart Client / Define Analysis Metrics (User Help).
To Define a Tracking Metric
-
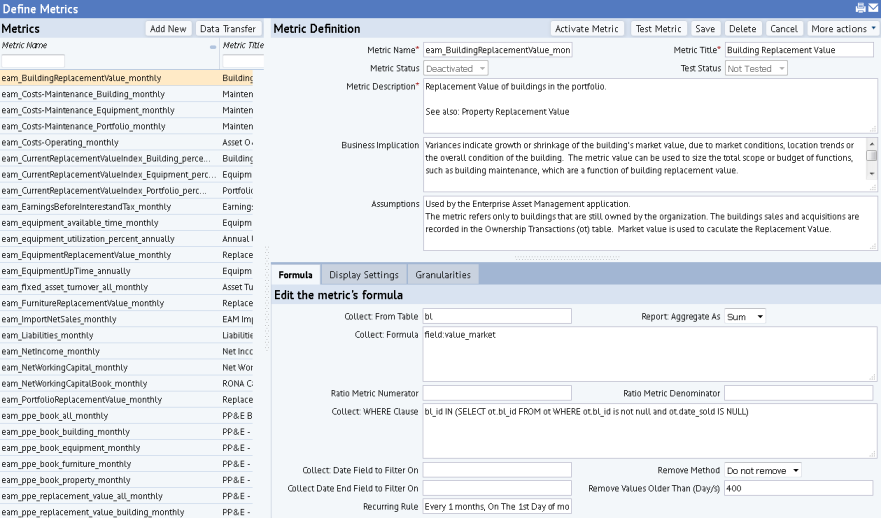
Load the Define Metrics form using System / Add-In Manager / Define Tracking Metrics (
http://localhost:8080/archibus/ab-metric-metrics-def.axvw).
- In the Define Metrics form, enter the Metric Definition. See the specific topics for details on each type of metric.
- Press Save to save your definition.
- Use the Test Metric action to perform a technical test of the metric. Doing so ensures that the metric will run and calculate values. This is a technical test only; passing this test does not mean that the results are as intended, only that the calculation succeeded in obtaining a result.
If you have sample data, the action will ask you to delete that data first using the Delete Sample Data button.
- Use the Activate Metric action to set the Metric Status to Active, so that the metric rule will calculate it.
Your metric is now defined. The metric rule will calculate it the next time today's date matches the metrics recurrence period.
The metric rule will only calculate metrics that have a Test Status of "Tested," and a Metric Status value of "Activated".
To Create a New Metric by Copying
You many want to create new metrics by copying existing metrics and then adjusting some of the properties or calculations.
- Load the source metric and review its definition in the right panel.
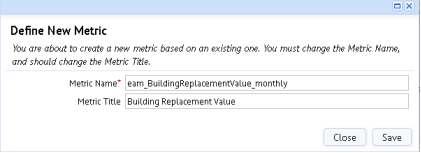
- In the upper right corner, choose the More Actions / Copy as New Metric button.
- The system prompts you to enter a new name and title. For information on best practices on naming metrics, see Naming Convention for Metrics.

- Archibus copies the existing metric definition to a new metric definition in
afm_metric_definitionsusing the new name and title that you provided. It sets the Test Status to Not Test and the Metric Status to Deactivated. It copies the associated granularities to the new metric in theafm_metric_granstable. - You can now adjust the new metric as needed.
To Deactivate a Metric
You may have a metric definition that you want to keep for reference or for future use, but that you do not want the metric rule to run.
In this case, select the Deactivate Metric button. This will set the Metric Status to Deactivated and the metric rule will not calculate it.
You can reactivate the metric by selecting the Activate Metric action.
If you simply wish to hide a metric on a scorecard, change it's "Displayed on Scorecard?" value in the System / Add-In Manager / Define Scorecard view.
To Delete a Metric
The Delete button on the metrics form deletes the metric from the database. Do use this action carefully. One you delete the metric, you have deleted all of your trend data. If this data is on an inventory table (as described below) you cannot recover the data.
Another consideration is whether the metric is used in another ratio metric. If you delete one metric, such as Gross Area, you can no longer use ratio metrics that depend on that metric, such as Energy Consumption (per Gross Area).
In order to delete a metric, first deactivate the metric using the Deactivate Metric button.
Using Sample Data for a Metric
As noted above, metrics are often used as part of change-management initiatives involving a broad range of roles. Business analysts and managers will propose groups of metrics for review. Teams will discuss the metrics, their definition, their assumptions, and their effects. Then the metric or the scorecard will often be revised several times before being put into practice.
Often, it is difficult to visualize the effects of a metric or what it will mean to your particular business units or departments until the team can see it. However, you do not want to have to run a metric for months or years before getting feedback as to whether it is the right performance indicator to track. For this reason, the Define Metrics form contains the "More Actions / Create Sample Data" button. This action generates sample trend data as well as data for your particular drill-down granularities, such as your own business units or departments.
In order prevent generating all sample metric trend values equal to 0, you should set the field "Report Target Limit" to a value <> 0. This is necessary because the routine for generating sample data uses the value in the field "Report Target Limit" as a start value for generating the rest of the series of sample metric values.
When it comes time to put a metric into action, use the "More Actions / Delete Sample Data" button, which deletes all sample data for that metric. The program tags every record of sample data with the word "example" in the Collect: Error Message field, so the program is able to keep sample data separate from production data and so that the program is able to completely remove all sample data when needed.
The "Test Metric" action will not succeed if there is any sample data for a metric. Metrics with sample data will always have a Test Status of "Test Failed" to indicate that the metric is not yet in production use.
See Also
How to Define a Metric on an Inventory Table
How to Define a Metric Relating Two Tables
How to Define a Metric on a Transaction Table
How to Define a Metric on a Transaction Date Range
How to Define a Metric that Uses Workflow Rules